The interface to your Website Hosting is known as cPanel, and it can be accessed in two ways.
The first way is to type https://www.yourdomain.com.au/cpanel into your Internet Browser’s navigation bar (where “yourdomain.com.au” is substituted with your actual Domain Name).
This will present a screen where you are required to enter your Username and Password.
This information was sent to you via Email when you signed up for Web Hosting.
Should you need this information to be sent again, please email us at info@spottydog.com.au
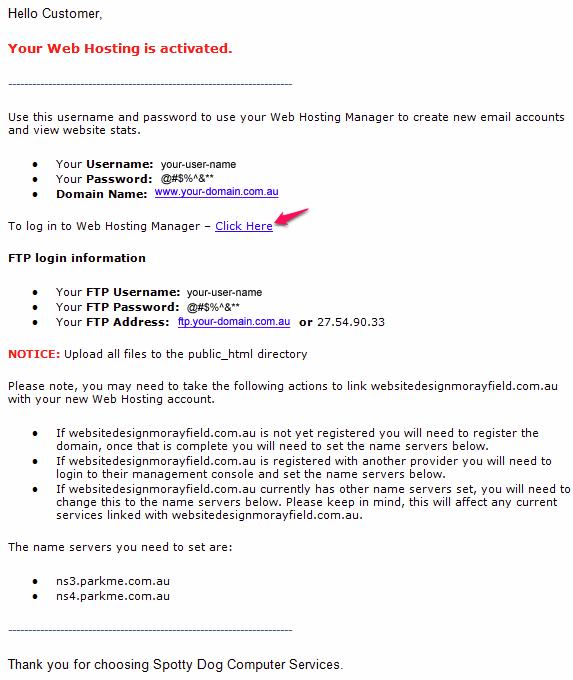
The other way to access your Website Hosting is by clicking on the link that was in the original email you were sent with the subject heading of “Your Web Hosting is Ready“.
You will be taken a web page that looks like this:
Either of these methods achieves and does the same thing.
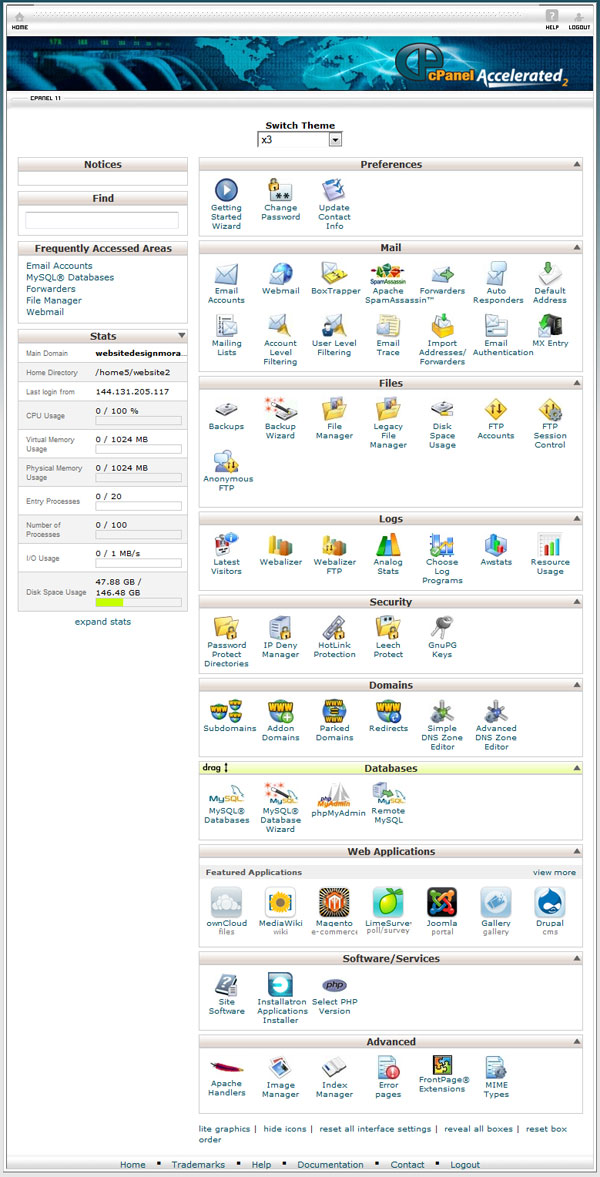
Once you have logged into your Hosting Account, you will see the following screen:
From here there are many things you can do, including creating and removing email addresses, changing email passwords, creating Autoresponders etc.
00Adminhttps://www.websitedesignmorayfield.com.au/wp-content/uploads/2022/08/Logo-Website-Design-Morayfield.pngAdmin2013-08-09 07:09:542021-04-30 10:04:20How to access your Hosting Account
This “How To” shows you how to set up an email address in Microsoft Outlook 2003.
For “How To’s” on setting up your Email in Microsoft Outlook Express or Microsoft Outlook 2007, please see our other “How To” Guides.
To Set Up Your E-mail in Microsoft Outlook 2003
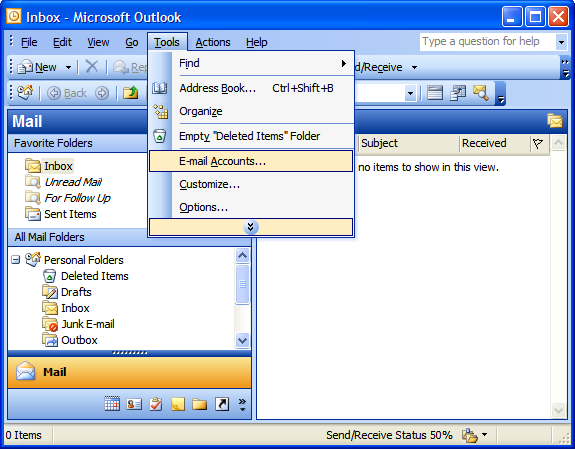
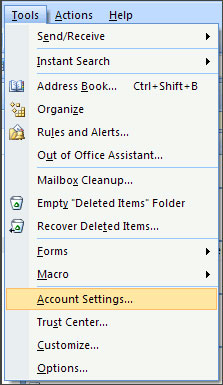
1. In Outlook 2003, click on the Tools menu, then select E-mail Accounts.
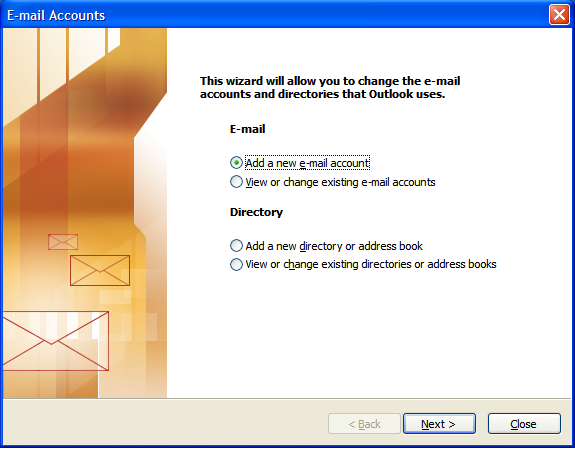
2. In the E-mail Accounts wizard window, select Add a new e-mail account, and then click Next.
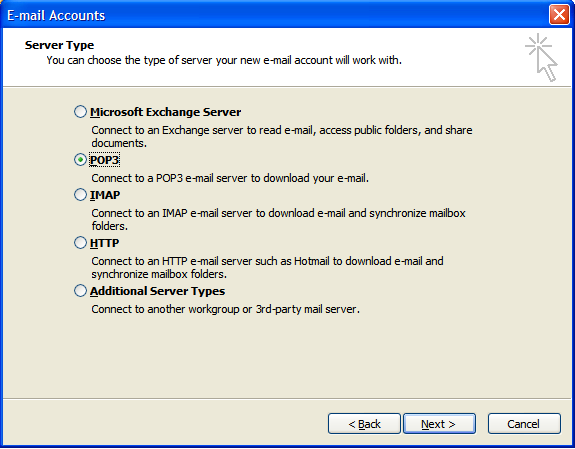
3. For your Server Type, select POP3 and then click Next.
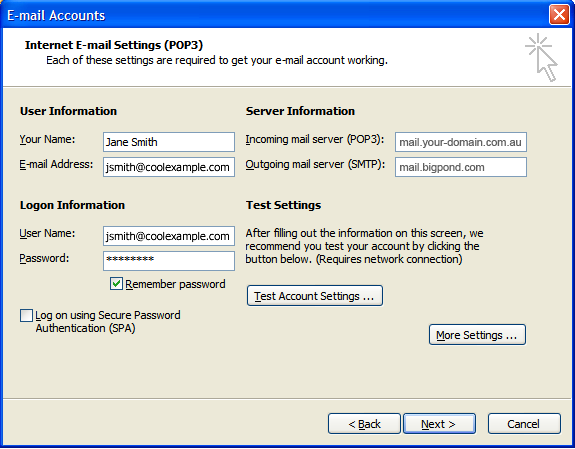
4. In the Internet E-mail Settings (POP3) window, enter your information as follows:
Your Name
Your first and last name. E-mail Address
Your full Email address. User Name
Your full Email address, again. Password
Your Email Account password that was chosen when the email address was setup. Incoming mail server (POP3)
“mail.your-domain.com.au” (where ‘your-domain.com.au is replaced with your actual Domain Name. Outgoing mail server (SMTP)
“your-outgoing-mail-server” (where ‘your-outgoing-mail-server is replaced with your specific Internet Provider’s Outgoing Mail Server (eg. “mail.bigpond.com” if Telstra Bigpond is your ISP, “mail.optusnet.com.au” for Optus, “mail.tpg.com.au” for TPG, etc).
7. Click Test Account Settings to verify everything is configured correctly.
8. Click Next and then click Finish.
Removing message copies from the Mail Server
1. On the Tools menu, click E-mail Accounts.
2. Click View or change existing e-mail accounts, and then click Next.
3. Select your account, and then click Change.
4. Click the More Settings button.
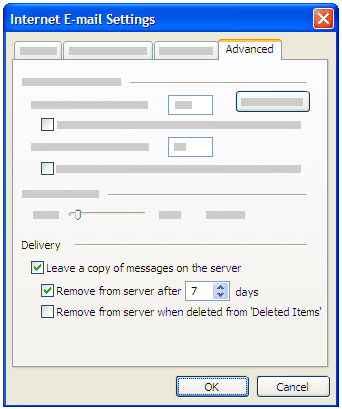
5. Click the Advanced tab, and under Delivery, select the Leave a copy of messages on the server check box.
6. Select the Remove from server after and type in a value of however many days you’s like. The example shows 7 days. This will tell the Mail Server to download all Email messages to your computer but only leave a copy of the messages on the server for a certain number of days. This allows people who want to read their messages at work but also download them for permanent storage on their home computer. We recommend that you choose the smallest number of days that suits your needs. The longer you leave messages on your Mail Server, the greater the risk of filling-up your Mail Server and exceeding your mailbox size quota.
7. Click OK, and then click Finish.
00Adminhttps://www.websitedesignmorayfield.com.au/wp-content/uploads/2022/08/Logo-Website-Design-Morayfield.pngAdmin2013-08-09 07:08:562013-08-09 07:08:56Setting up your Email in Microsoft Outlook 2003
This “How To” shows you how to set up an email address in Microsoft Outlook 2007.
For “How To’s” on setting up your Email in Microsoft Outlook Express or Microsoft Outlook 2003, please see our other “How To” Guides.
To Set Up Your E-mail in Microsoft Outlook 2007
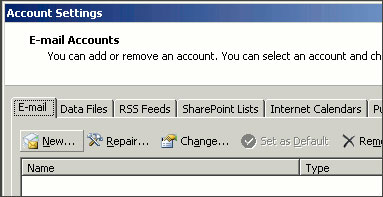
1. In Outlook 2007, from the Tools menu, select Accounts.
2. On the E-mail tab, click New.
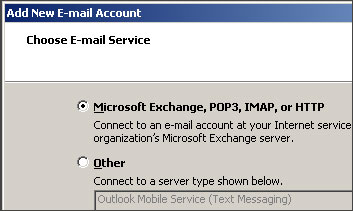
3. Select Microsoft Exchange, POP3, IMAP, or HTTP and click Next.
4. Check Manually configure server settings or additional server types and click Next.
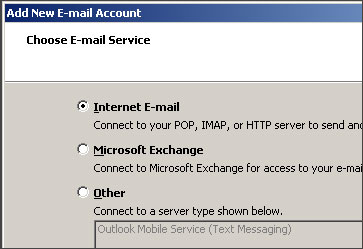
5. Select Internet E-mail and click Next.
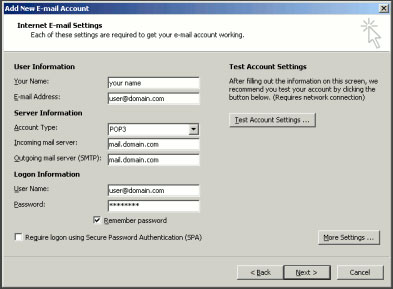
6. Enter the requested information:
Your Name
Your first and last name. E-mail Address
Your full Email address. Account Type
POP3 Incoming mail server (POP3) “mail.your-domain.com.au” (where ‘your-domain.com.au is replaced with your actual Domain Name). Outgoing mail server (SMTP) “your-outgoing-mail-server” (where ‘your-outgoing-mail-server is replaced with your specific Internet Provider’s Outgoing Mail Server (eg. “mail.bigpond.com” if Telstra Bigpond is your ISP, “mail.optusnet.com.au” for Optus, “mail.tpg.com.au” for TPG, etc). User Name
Your full Email address. Password
Your Email Account password that was chosen when the email address was setup.
7. Click Test Account Settings to verify everything is configured correctly.
8. Click Next and then click Finish.
Removing message copies from the Mail Server
1. On the Tools menu, click E-mail Accounts.
2. Click View or change existing e-mail accounts, and then click Next.
3. Select your account, and then click Change.
4. Click the More Settings button.
5. Click the Advanced tab, and under Delivery, select the Leave a copy of messages on the server check box.
6. Select the Remove from server after and type in a value of however many days you’s like. The example shows 7 days. This will tell the Mail Server to download all Email messages to your computer but only leave a copy of the messages on the server for a certain number of days. This allows people who want to read their messages at work but also download them for permanent storage on their home computer. We recommend that you choose the smallest number of days that suits your needs. The longer you leave messages on your Mail Server, the greater the risk of filling-up your Mail Server and exceeding your mailbox size quota.
7. Click OK, and then click Finish.
00Adminhttps://www.websitedesignmorayfield.com.au/wp-content/uploads/2022/08/Logo-Website-Design-Morayfield.pngAdmin2013-08-09 07:07:042013-08-09 07:07:04Setting up your Email in Microsoft Outlook 2007
From time to time, you may have a need to use your Webmail facility.
This may because you need to access your email whilst using someone else’s computer, or you may be having an issue with your email service and you want to test it to see if it’s working.
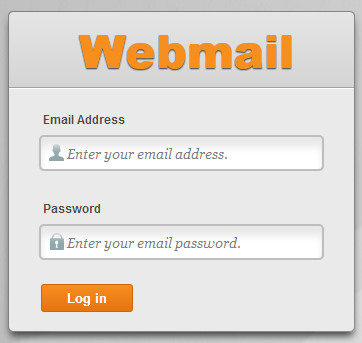
Using Webmail is very easy. Simply visit www.yourdomain.com.au/webmail (where “yourdomain.com.au” is substituted with your actual Domain Name).
This will present a screen where you are required to enter your Username and Password.
Enter your email address as the Username, and whatever Password you chose when you setup your email address, and then click “Log in”.
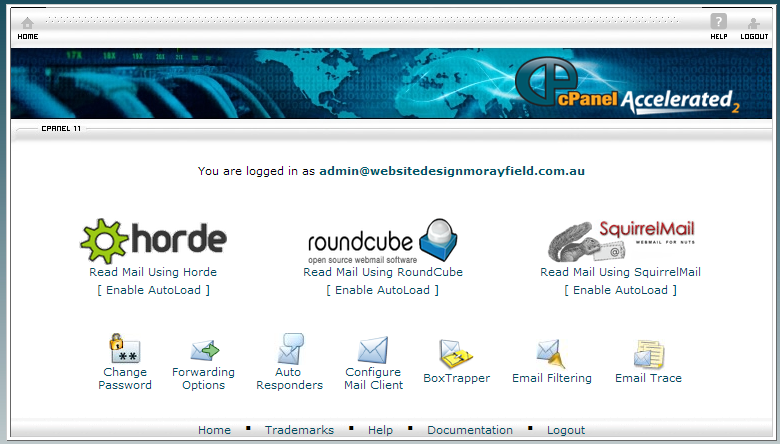
Once you have done this, you will be presented with the following screen.
You have three options to choose from. They all do the same thing, but just look different. I personally prefer “RoundCube”, so that’s what we’ll run with.
After clicking on RoundCube, you will see the Webmail interface and the Inbox, with any emails that are waiting.
From here, it is pretty much like using any email program, so I won’t go into the nitty gritty’s.
Suffice to say that you can perform all of the same functions as you can with any email program.
00Adminhttps://www.websitedesignmorayfield.com.au/wp-content/uploads/2022/08/Logo-Website-Design-Morayfield.pngAdmin2013-08-09 07:06:362013-08-09 07:06:36How to use Webmail
This “How To” shows you how to set up an email address in Microsoft Outlook Express.
For “How To’s” on setting up your Email in Microsoft Outlook 2003 or Microsoft Outlook 2007, please see our other “How To” Guides.
To Set Up Your E-mail in Microsoft Outlook Express
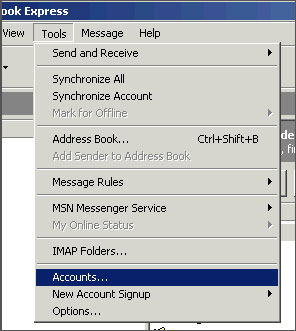
1. In Outlook Express, from the Tools menu, select Accounts.
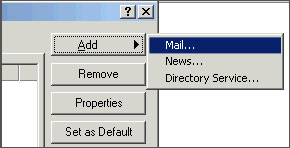
2. A box will appear. Click Add and select Mail.
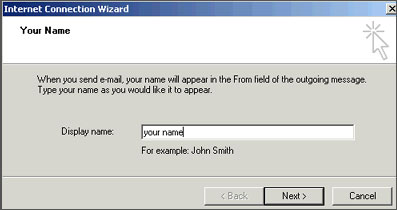
3. In Display name, enter your name as you would like it to appear on your emails and click Next.
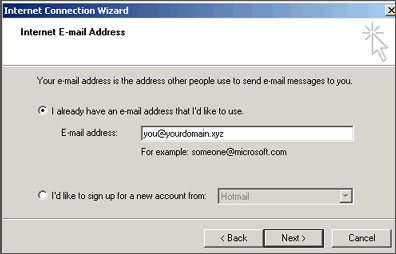
4. In E-mail address, enter your full email address and then click Next.
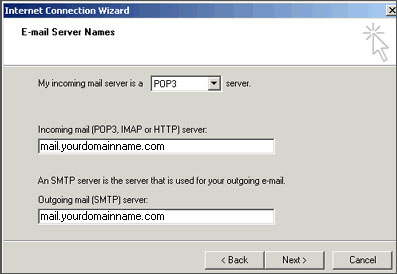
5. On the E-mail Server Names window, enter your information as follows:
My incoming Mail Server is
POP3 Incoming mail (POP3, IMAP or HTTP) server
“mail.your-domain.com.au” (where ‘your-domain.com.au is replaced with your actual Domain Name). Outgoing mail (SMTP) server
“your-outgoing-mail-server” (where ‘your-outgoing-mail-server is replaced with your specific Internet Provider’s Outgoing Mail Server (eg. “mail.bigpond.com” if Telstra Bigpond is your ISP, “mail.optusnet.com.au” for Optus, “mail.tpg.com.au” for TPG, etc).
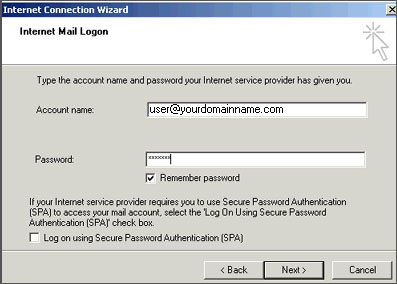
6. Click on Next.
7. In Account name, enter your full Email address, then enter the password that was chosen when the email address was setup.
Removing message copies from the Mail Server
1. On the Tools menu, click E-mail Accounts
2. Click View or change existing e-mail accounts, and then click Next.
3. Select your account, and then click Change.
4. Click the More Settings button.
5. Click the Advanced tab, and under the Delivery section, select the Leave a copy of messages on the server check box.
6. Select the Remove from server after and type in a value of however many days you’s like. The example shows 7 days. This will tell the Mail Server to download all Email messages to your computer but only leave a copy of the messages on the server for a certain number of days. This allows people who want to read their messages at work but also download them for permanent storage on their home computer. We recommend that you choose the smallest number of days that suits your needs. The longer you leave messages on your Mail Server, the greater the risk of filling-up your Mail Server and exceeding your mailbox size quota.
7. Click OK, and then click Finish.
00Adminhttps://www.websitedesignmorayfield.com.au/wp-content/uploads/2022/08/Logo-Website-Design-Morayfield.pngAdmin2013-08-09 07:06:272013-08-09 07:06:27Setting up your Email in Microsoft Outlook Express
The first step is to log into your Web Hosting account, the interface is known as cPanel.
To log-in, enter http://www.yourdomain.com.au/cpanel into your Internet Browser’s navigation bar (where “yourdomain.com.au” is substituted with your actual Domain Name).
This will present a screen where you are required to enter your Username and Password.
This information was sent to you via Email when you signed up for Web Hosting.
Should you need this information to be sent again, please email us at info@spottydog.com.au
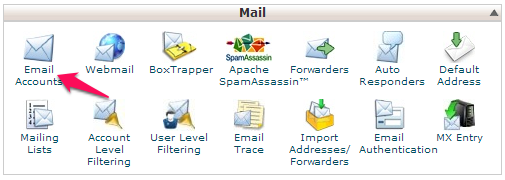
Once inside the cPanel system, click on the ‘Email Accounts’ icon, located near the top of the cPanel page, in the section named “Mail”. This will take you to the Email account screen where you can add/delete/modify email accounts.
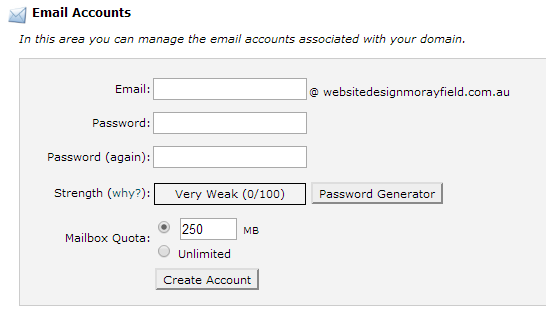
To create a new email account simply fill in the necessary form fields as described below:
Email: Enter the prefix for your email. For example “info” or “admin” etc.
Password: Enter the password that you wish to use for this account. You will need to enter it twice to indicate that you haven’t mistyped it. You can also use the “Password Generator” button next to the Strength Indicator, which will automatically create a password for you. Just remember that the password is randomly generated and although very secure, it can be difficult to remember!
Mailbox Quota: Enter the total amount of megabytes that you want the mail account to have. If you ignore this field, the default value of 250MB will be used. Or you can choose “Unlimited”.
Click “Create Account” to immediately activate the account.
The email account will be active immediately and you can start sending and receiving email with it.
You can do that via webmail by visiting www.yourdomain.com.au/webmail, or by setting up an email client to use the email address.
Using Webmail and setting up an email clients is a different topic of conversation.
00Adminhttps://www.websitedesignmorayfield.com.au/wp-content/uploads/2022/08/Logo-Website-Design-Morayfield.pngAdmin2013-08-09 07:05:062013-08-09 07:05:06How to setup an email address in cPanel
From this page, not only can you purchase the products listed above, but you can search for Domain Name availability, Transfer a Domain Name, View Pricing information, and log in to your Account and Hosting Manager.
00Adminhttps://www.websitedesignmorayfield.com.au/wp-content/uploads/2022/08/Logo-Website-Design-Morayfield.pngAdmin2013-08-09 07:04:472013-08-09 07:04:47New Shop Front Interface
Being a Caboolture Morayfield based Website Design Company, we thought it would be a good idea to setup a website dedicated to locally based website customers and showcase some of the things that can be achieved with a modern website.
On this website we will endeavour to feature new website capabilities, tips and tricks, useful web design information, and publish information generally useful to business websites via our Blog.
As always, your feedback is important and indeed highly sought, so feel free to drop us a line via email, social media, or telephone.
Iain Kennedy is your local Web Designer, and has a diverse range of experience in different Industry Sectors.